
Armagh CC Digital Academy: The Ultimate Fielding & Wicketkeeping Guide
Building Outstanding Defenders: Skill, Athleticism, Awareness, and Leadership
Fielding and wicketkeeping are arguably the most influential yet underrated disciplines in cricket. Every match-winning run out, clean diving stop, or lightning-fast stumping has the immediate power to shift momentum in a single delivery.
While batting and bowling often dominate discussion, a disciplined, aggressive defensive unit wins championships.
At Armagh Cricket Club Academy, we view fielding and keeping not as passive tasks, but as active ways to control the game.
Exceptional fielders and keepers combine flawless athletic fundamentals with intense tactical communication and relentless physical effort.
Use this guide to master your defensive mechanics, command your field, and execute specialist training drills using your club's equipment on The Mall
Quick Navigation Index
Part 1: The Elite Fielder Mindset & Ready Posture
Essential Foundation - All Ages & Skill LevelsPart 2: Ground Fielding & Catching Library
Beginner Basics to Refined Fundamentals - All AgesPart 3: The Complete Guide to Fielding Positions
Match Play Mapping - Intermediate & Advanced DevelopmentPart 4: Specialist Wicketkeeping Mechanics
Senior Keepers - Advanced & Elite SpecialismPart 5: Training, Fitness & Drills
Fitness, Drills & Player Development - All Ages & Skill Levels
Part 1:
The Elite Fielder Mindset and Ready Posture
Focus: Developing an aggressive defensive attitude and maximising your reaction speed.
Fielding is an attitude. Elite fielders treat every single delivery as a personal opportunity to impact the score, save a run, or take a match-changing wicket.
The Three Operational Pillars of Elite Fielding
Anticipation:
Average fielders merely react to where the ball goes; exceptional fielders actively anticipate.
They track the bowler’s line and length, watch the batter’s foot alignment and wrist angle, and begin moving dynamically into the ball’s expected path before it even impacts the blade.
Commitment:
Every single run matters.
Throwing your body into a diving stop or chasing down an outfield boundary is a non-negotiable standard that lifts your teammates and frustrates the opposition.
Communication:
A silent field leads to drops, collisions, and missed run outs.
Clear, early, and confident volume keeps the side organised.
The Balanced Ready Position
A poor starting posture causes slow feet and delayed reactions.
You must adopt an athletic ready position just before the bowler enters their release point.
✅ Ready Position Checklist:
Feet parallel and spaced slightly wider than shoulder-width apart.
Body weight evenly balanced on the balls of your feet, never back on your heels.
Knees and hips comfortably flexed to lower your centre of gravity.
Hands held relaxed and out in front of your body at waist height, ready to move in any direction.
Eyes level, sharp, and focused intensely on the bat face.
Resetting After a Misfield, Drop, or Missed Run Out
Every fielder - at every level - drops catches, misfields, and misses run out opportunities. These moments are a natural part of cricket. What separates good fielders from great ones is not the absence of mistakes, but the speed and quality of their mental recovery.
A dropped catch cannot be retaken. But a dropped catch that you immediately reset from costs your team nothing more than that single opportunity. The next ball is a completely fresh chance to influence the game.
📋 The Fielder’s Mental Reset Process
🟢 Step 1 - Acknowledge
Accept what happened without dwelling on it.
One mistake does not define your contribution to the team or your ability as a fielder.
Every elite fielder you have ever admired has dropped a catch or misfielded.
🟡 Step 2 - Clear
Use a simple physical trigger to draw a line under the moment - clap your hands together once, take a slow breath, or reset your feet into your ready position.
This signals to your brain that the previous ball is finished and gone.
Your ready position is your reset point.
🔴 Step 3 - Refocus
Bring your full attention back to the next delivery only.
Not the dropped catch.
Not your teammates’ reactions.
Not the batter’s celebration.
Get back into your ready position, pick up the bowler, and be ready to win the next ball.
⭐ The best fielders forget their mistakes instantly and back themselves completely on the next chance. Reset, refocus, and be ready.
Part 2:
Ground Fielding and Catching Guide
Focus: Eliminating errors, presenting soft hands, and executing accurate throws.
1. Ground Fielding: The Long Barrier vs. Attacking the Ball
The Long Barrier (Defensive Security):
Use this technique to secure the boundary or stop hard-hit balls along the ground safely.
Line your body up completely behind the path of the ball.
Drop your outer knee completely to the turf, overlapping it behind the heel of your opposite foot to create a continuous wall.
Present wide, open palms with your fingers pointing into the grass to collect the ball cleanly.
Attacking the Ball (Sprinting / Picking up):
Never wait for the ball to come to you on slow outfields.
Sprint forward aggressively to meet the ball, lowering your body side-on to collect it on the inside of your front foot.
This momentum allows you to transition into your throwing stride immediately.
2. Mastering the Catch: Soft Hands & Eye Alignment
Dropped catches usually happen because fielders look away early or tense their muscles upon impact.
High Catches:
Move early to position your torso directly underneath the descending ball, creating a wide, unshakeable leg base.
Form a cup with your hands above eye level.
Keep your eyes locked on the ball through the gap in your hands, tracking it directly into your palms.
Soft Hands Principle:
Do not “snatch” at the ball or push your hands upward to meet it.
Keep your wrists and shoulders completely relaxed.
Allow the weight of the ball to push your hands back towards your chest upon impact to absorb the kinetic energy.
Tension (”hard hands”) will only cause the ball to bounce out of your grasp.
3. Throwing Mechanics: Accuracy Over Power
A lightning-fast pickup is completely wasted if the throw misses the target or bypasses the keeper. Prioritise structural technique over brute force.
The Technique:
Point your non-throwing front shoulder and hip directly at your target zone.
Step towards the target line, bring your throwing hand back in a high, clean arc, and release the ball with a high elbow.
Complete your action with a balanced follow-through across your body.
Common Error:
❌ Collapsing the front side and pulling the head away at release
This causes the throwing arm to drag across the body rather than driving through the target, pulling the throw consistently to the left of the intended target and robbing it of both accuracy and power.
✅ The Correction:
Keep your front shoulder pointed firmly at your target all the way through the throw.
Think of your non-throwing arm as an arrow pointing directly at where you want the ball to go - only pull it through once your throwing arm has begun its forward path.
Keep your head steady and your eyes locked on the target right through the release point and into your follow-through.
🛡️ High Catch Technique vs Long Barrier Setup
1. High Catch Technique (Overhead Catch)
The Track: Eye line locks onto the ball, tracking it completely into the centre of your cupped palms.
The Catch Window: Keep your hands high, relaxed, and slightly above your eye level to maximise visibility.
The Foundation: Maintain a wide, completely stable foot base to absorb the descending weight without stumbling.
2. The Long Barrier Setup (Ground Defensively)
The Alignment: Place your entire physical torso directly behind the line of the incoming ball path.
The Barrier: Drop down sideways so your left knee slides down to touch and lock tightly against your right heel.
The Safety Net: If the ball unexpectedly skips over your hands, it is safely stopped dead by your shin and chest.
Part 3:
Guide To Fielding Positions
Focus: Understanding your unique physical and tactical responsibilities across the ground.
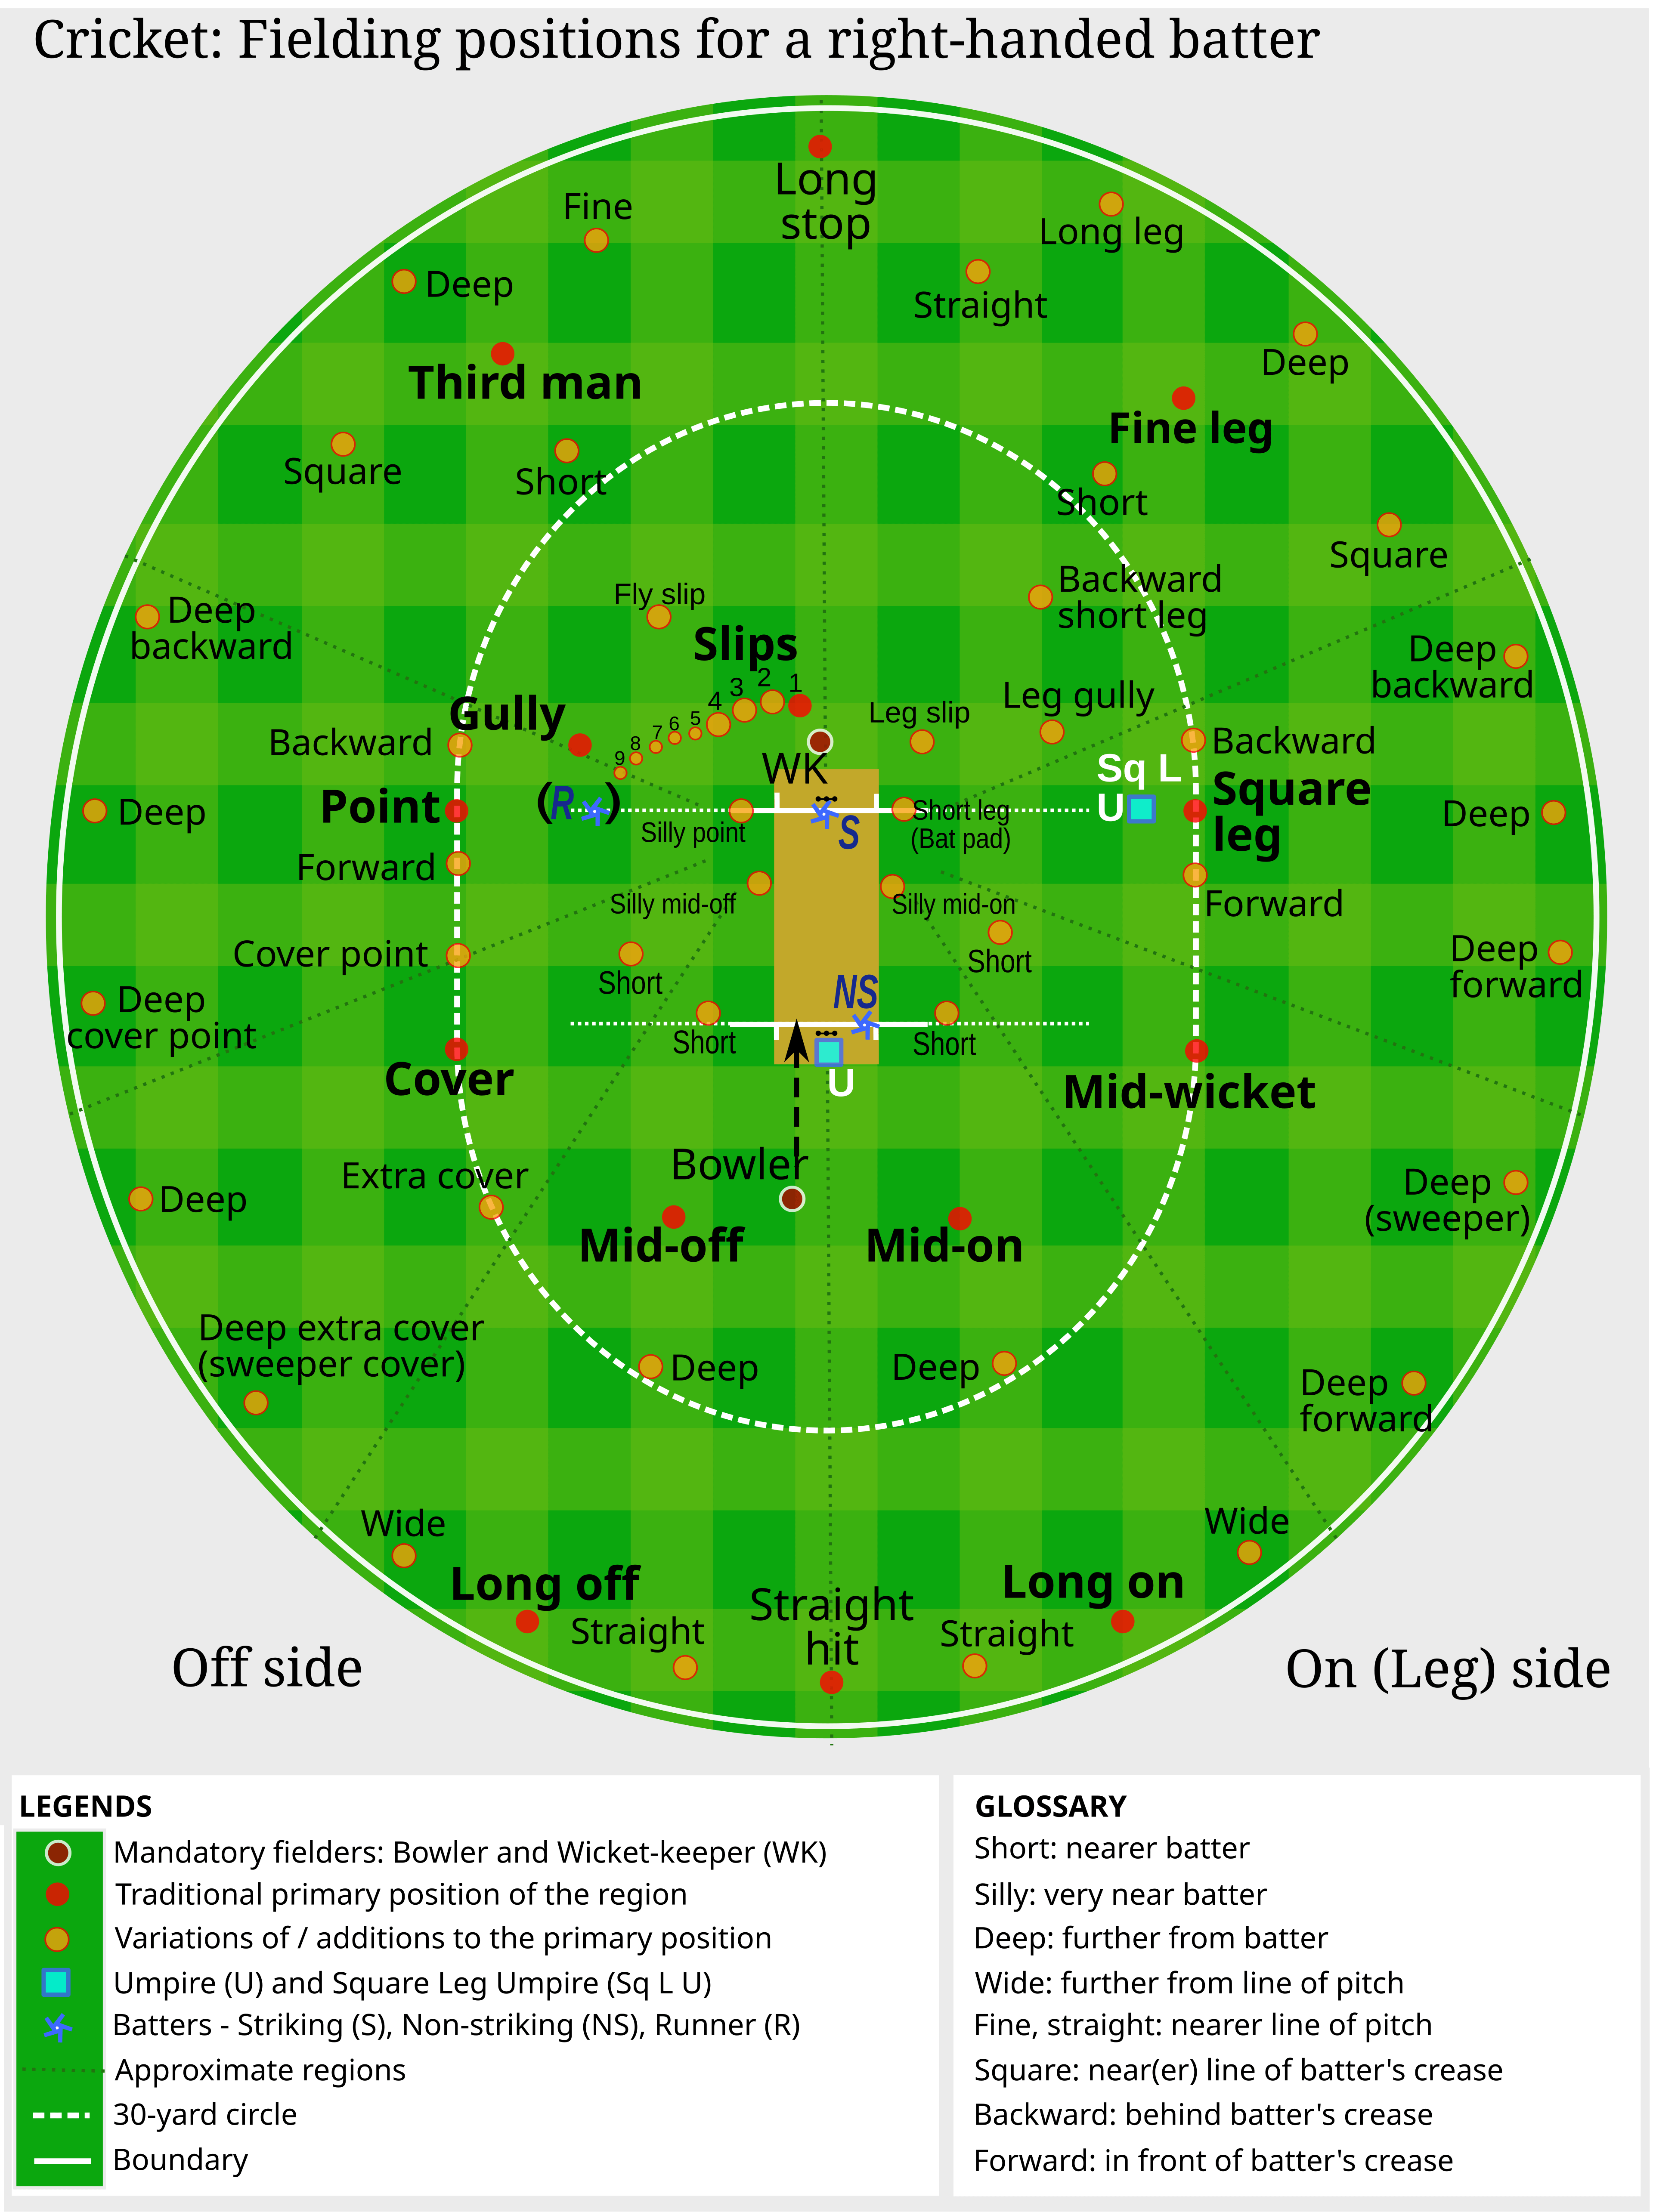
Every position on the field requires a highly distinct skill set and a precise tactical role to support the bowling strategy.
The Close Cordon
(Advanced / Elite)
Core Positions: First/Second Slip, Gully, Short Leg, Silly Point.
Required Physical Traits: Elite reflex speed, short-range hand-eye coordination, supreme concentration.
Key Tactical Responsibility: Present soft hands to secure thick edges off fast bowlers or bat-pad catches off spin. Remain low and expect every single ball to fly to you.
The Inner Ring
(All Skill Levels)
Core Positions: Point, Cover, Mid-Off, Mid-On, Mid-Wicket.
Required Physical Traits: Rapid short-range agility, explosive diving ability, clean pick-up and release speed.
Key Tactical Responsibility: Intercept hard drives, prevent easy strike-rotation singles, and create fast, accurate run-out opportunities.
The Deep Outfield
(Intermediate / Advanced)
Core Positions: Third Man, Fine Leg, Deep Mid-Wicket, Long-Off.
Required Physical Traits: Long-range speed, accurate boundary judgement, immense throwing strength.
Key Tactical Responsibility: Save boundaries via controlled sliding stops, hold high-pressure catches, and execute flat, long-range throws into the keeper.
📋 Armagh CC Run Out Execution Guide
Run outs are among the most electrifying moments in cricket and among the most poorly executed at club level. A clean run out requires every member of the fielding unit to understand their role simultaneously - not just the player with the ball.
🟢 The Direct Hit Attempt
Aim for the base of the stumps rather than the top of the bails
Release the ball early from a stable, balanced base - do not wait until you are perfectly set if time is critical
Back yourself - hesitation is the most common cause of missed run out opportunities
Best executed from the inner ring where the stumps are within accurate throwing range
🟡 The Relay Throw
When the ball is retrieved deep in the outfield, a single long throw rarely reaches the keeper accurately at full pace
A relay fielder should position themselves halfway between the outfielder and the stumps
The outfielder hits the relay player cleanly and moves into a backing-up position
The relay player turns and delivers a flat, accurate throw directly to the keeper or bowler’s end
🔴 Backing Up
Every throw requires a fielder behind the stumps at both ends
The bowler backs up the keeper’s end on every return throw
Mid-on and mid-off back up throws to the bowler’s end
A missed back-up on a misfield or overthrow is a completely avoidable gift of runs to the opposition
⭐ A run out is a team dismissal. Every player on the field has a role - not just the one with the ball.
Fielder Communication & Captain Support
Cricket fields itself as a team sport but fielding is where that teamwork is most visibly tested. Every fielder has a responsibility not just to stop the ball, but to actively support their captain, their bowler, and their teammates throughout every over.
📋 Armagh CC Fielder Communication Guide
🔵 Before the Over Begins
Acknowledge your captain’s field placement clearly — move promptly and decisively to your position
If you have a concern about your position or feel a different placement might be more effective, raise it calmly and quickly between overs — never during the bowler’s run-up
Check your awareness of the match situation — how many runs to defend, how many wickets remain, and where the danger areas are
🔵 During the Over
Call loudly and early for every ball that comes to you — “mine” eliminates collisions between fielders
Communicate run out opportunities instantly — “yes”, “no”, or “back” must be called immediately and clearly
Encourage your bowler after every delivery — a single word of support costs nothing and builds team momentum
🔵 Between Overs
Share observations with your captain and bowler — if you have noticed the batter favouring a particular shot or leaving a gap, say so
Reset your ready position before every delivery — never be caught flat-footed because you were distracted between balls
⭐ A well-organised, vocal fielding unit feels like eleven players working as one. Communication is the difference between a good fielding side and a great one.
Part 4:
Specialist Wicketkeeping Mechanics
Focus: Glove work efficiency, decisive footwork channels, and lightning stumpings.
The wicketkeeper is the heartbeat and the tactical voice of the fielding side. Because you touch the ball on almost every delivery, absolute mechanical consistency is a non-negotiable requirement.
1. The Fundamental Keeper’s Stance
The Setup:
Position your feet slightly wider than shoulder-width apart, with your weight balanced evenly on the balls of your feet to allow instant lateral movement.
The Posture:
Keep your head completely still, your chin up, and your eyes level.
Squat down low, keeping your hips flexed and your hands hanging relaxed between your knees with open, relaxed palms.
Common Error:
❌ Standing too tall or rising too early.
✅ The Correction:
If the delivery stays low, you must stay down with it - rise gradually with the bounce of the ball, never ahead of it.
2. Standing Back to Fast Bowlers
The Channel:
Track the trajectory of the ball intensely from the bowler’s release point all the way into your gloves.
Footwork Over Reaching:
Never lunge with your arms alone.
Move your feet first into the line of the ball, ensuring your head and torso are aligned directly behind the gloves at collection.
Keep your fingers pointing down towards the turf for low takes, and let your hands give back towards your body to absorb the impact.
Common Error:
❌ Reaching across the body for wide deliveries rather than moving the feet
This pulls the head away from the line of the ball, causes fumbles, and creates a significant bye risk on wide deliveries.
✅ The Correction:
Always move your feet first.
A wide delivery to the right requires your right foot to move first, bringing your body behind the ball before your gloves receive it.
Your hands should always collect the ball in front of your body - never across it.
3. Standing Up to the Stumps (Spin & Slower Seam)
Standing up applies immense psychological pressure to the batter, restricting their crease movement and creating lethal stumping opportunities.
The Stumping Rule: Collect first, break second.
Never rush your hands forward to snatch at the ball before it arrives.
Receive the ball cleanly with soft hands behind the line of the stumps, and sweep your gloves back dynamically in one fluid motion to remove the bails.
Taking Spin:
Watch the bowler’s release to read variations early.
Keep your inside foot anchored firmly next to the off-stump line to maintain balance.
If the ball drifts or spins down the leg side, stay low, slide your feet across late, and ensure your gloves stay inside your body line for a clean collect.
Part 5:
Training, Fitness & Drills
Confidence comes from structured preparation, not luck. Incorporate these club drills into your practice to lock in muscle memory and master match-day performance.
🔥 Pre-Session Warm-Up Protocol
Never take the field cold. Prepare your body and your mind before every session and match.
Allow 10-15 minutes before any fielding session or match. Fielding demands explosive lateral movement, rapid throwing actions, and sharp hand-eye coordination - all of which require proper activation first.
Stage 1 - General Activation (3-4 minutes)
Light jog or skip around the boundary to raise your heart rate and body temperature
High knees, heel flicks, and lateral side-steps to wake up your hips and legs
Explosive direction changes - sprint 5 metres, stop, change direction, repeat
Stage 2 - Dynamic Stretching (4-5 minutes)
Leg swings front-to-back and side-to-side - 10 reps each leg
Hip circles - 10 reps each direction
Lunge with a twist - 8 reps each leg
Arm circles - small to large, 10 reps each direction
Shoulder cross-body pulls - 10 reps each arm
Torso rotations with arms extended - 10 reps each side
Stage 3 - Shoulder & Throwing Activation (2-3 minutes)
Resistance band shoulder rotations (internal and external) - 12 reps each
Wrist circles and finger extensions - 10 reps each direction
Throwing arm windmills - slow and controlled, 10 reps
Short-range partner throws - build gradually from 5 metres to full throwing distance
Stage 4 - Reflex & Reaction Activation (3-4 minutes)
Short-range catching with a partner - soft hands focus
Lateral shuffle and stop - 5 metres each direction, 6 reps
React and catch - partner drops ball from waist height without warning, fielder catches before second bounce
✅ Warm-Up Checklist
Have I raised my heart rate and broken a light sweat?
Have I activated my shoulders, hips, and wrists specifically?
Have I completed short-range throwing and catching before full-intensity drills?
Am I mentally switched on and focused — not just physically ready?
📋 Armagh CC Fielding & Keeping Practice Guidelines
Structure your practice intelligently. Sharp, focused sessions produce far better results than long, unfocused ones.
Fielding practice places significant demands on the shoulders, lower back, and legs through repeated throwing, diving, and explosive lateral movements. The following guidelines help coaches plan purposeful sessions by age group.
🟢 Under 13s
Recommended session length: 30-40 minutes of active fielding practice
Focus: Ready position, long barrier, high catches, and short-range throwing accuracy
Rest: Short breaks every 15 minutes — young shoulders fatigue quickly under throwing volume
Throwing volume: Limit hard throws — focus on technique over distance
🟡 Under 15s
Recommended session length: 40-50 minutes of active fielding practice
Focus: Attacking the ball, relay throws, catching under pressure, and basic keeping stance
Rest: Short breaks every 20 minutes
Throwing volume: Begin building distance gradually — always prioritise technique first
🟠 Under 17s
Recommended session length: 50-60 minutes of active fielding practice
Focus: Match scenario simulation, run out execution, specialist position drills
Rest: Break between structured drills and scenario-based practice
Throwing volume: Full-distance throwing with proper warm-up — monitor shoulder fatigue carefully
🔴 Senior
Recommended session length: As match preparation demands
Focus: Match-specific preparation, positional awareness, and pressure simulation
Rest: Monitor fatigue — tired fielders make poor decisions and risk shoulder injury
Throwing volume: Quality over quantity — reset between drill sets
⚠️ Shoulder injuries from overuse and poor throwing mechanics are among the most common fielding injuries at club level. Never throw through pain — report any shoulder discomfort immediately.
🧘 Post-Session Cool-Down & Recovery Routine
What you do after your session prepares your body for next time.
Fielding places specific demands on your shoulders, throwing arm, lower back, and legs. A proper cool-down reduces soreness and protects against overuse injuries.
Stage 1 - Gentle Movement (3-4 minutes)
Walk a few relaxed laps to gradually lower your heart rate
Shake out your arms, wrists, and hands loosely
Gentle torso rotations to release tension in your lower back
Stage 2 - Static Stretching (8-10 minutes - hold each stretch for 30 seconds)
🔵 Lower Body
Hip flexor lunge stretch - critical for explosive lateral movement recovery
Hamstring stretch - seated or standing
Glute stretch - figure-four position
Calf stretch against a wall
🔵 Upper Body & Throwing Arm
Cross-body shoulder stretch - each arm, essential after throwing sessions
Chest opener - clasp hands behind your back and open the chest wide
Tricep stretch - each arm
Forearm flexor stretch - extend your arm and gently pull your fingers back toward your body
Wrist circles - slow and controlled, 10 reps each direction
🔵 Lower Back & Core
Child’s pose - hold for 45 seconds
Knee-to-chest pull - each leg individually, then both together
Cat-cow spinal mobility - 10 slow repetitions
Seated torso rotation - 10 gentle reps each side
Stage 3 - Recovery Habits
Rehydrate immediately - water or an electrolyte drink
Eat within 30-45 minutes to support muscle recovery
Apply ice to any areas of shoulder or elbow soreness for 10-15 minutes
Log your session - note what you worked on and how your body felt
✅ Recovery Checklist
Have I stretched my shoulders, throwing arm, and lower back thoroughly?
Have I rehydrated and eaten within 45 minutes of finishing?
Have I noted any areas of discomfort to monitor or report to a coach?
🎯 Core Weekly Development Plan
Session 1 - Technical Precision:
Focus entirely on your ready position, long barrier technique, catching fundamentals, and basic throwing mechanics.
Session 2 - Athletic & Skill Development:
Focus on explosive lateral movement, diving stops, high catching under pressure, and throwing accuracy over distance.
Session 3 - Match Scenario Simulation:
Put your skills under match pressure — run out scenarios, catching under pressure with a batter present, and keeping drills against pace and spin.
💪 Fielder & Keeper Bodyweight S&C Circuit
Build a fielding body anywhere — no gym required.
Fielding power and durability come from explosive lateral speed, throwing arm strength and resilience, core rotational stability, and sharp reactive balance. This circuit targets all of these specifically. Perform 2-3 times per week on non-consecutive days.
The Circuit - 3 Rounds
20 seconds rest between exercises. 90 seconds rest between rounds.
🔵 Core & Rotational Stability
Plank with Shoulder Taps - 10 each side - Core stability under movement
Dead Bugs - 10 each side - Deep core & coordination
Russian Twists - 15 each side - Rotational endurance
Superman Holds - 10 reps, 3 second hold - Lower back & spinal control
🔵 Explosive Lateral Movement & Leg Power
Lateral Bounds - 8 each side - Explosive sideways movement mimicking diving stops
Squat Jumps - 10 reps - Explosive lower body power
Reverse Lunges - 10 each leg - Hip strength & balance
Single-Leg Balance Hold - 30 seconds each leg - Stability & landing control
🔵 Throwing Arm & Shoulder Resilience
Resistance Band External Rotations - 15 each arm - Rotator cuff strength
Press-Ups - 12-15 reps - Shoulder & chest foundation
Resistance Band Pull-Aparts - 15 reps - Shoulder stability & posture
Wrist Curl & Extension - 15 reps each direction - Forearm & wrist resilience
Progression Plan
🟢 Weeks 1-2 - 2 rounds. Focus entirely on technique and control.
🟡 Weeks 3-4 - 3 rounds. Increase reps slightly as strength builds.
🔴 Week 5+ - Add a light resistance band or small hand weights where appropriate.
✅ S&C Checklist
Am I performing every exercise with controlled technique rather than rushing for reps?
Am I completing this circuit consistently 2-3 times per week?
Am I giving my body at least one full rest day between circuit sessions?
Am I combining this with my batting and bowling circuits carefully to avoid overloading my body?
⚾ Outfield & Inner Ring Fielding Drills
1. The Sidearm Agility & Ground Intercept Drill
Purpose:
Sharpens rapid lateral movement, sliding stops, and clean pickups under match-tempo pressure.
Setup:
Place two plastic cones 6 metres apart to represent an infield gap
Position a fielder in an athletic ready stance between the cones
Method:
The coach stands 15 metres away using a sidearm ball thrower to whip hard, realistic ground drives dynamically left or right of the fielder
The fielder must explode laterally, execute a clean collection or diving slide, scramble to their feet, and deliver a flat throw to a target
2. The Rebounder Multi-Catch Challenge
Purpose:
Sharpens close catching reflexes, high catching judgement, and soft-hand absorption.
Setup:
Position an outdoor rebounder net 8 metres in front of a line of fielders
Method:
The coach strikes balls hard into the rebound net using a sidearm or bat to create random, unpredictable deflections
Fielders must read the flight instantly, adjust their feet, and secure the catch using relaxed, soft hands
Vary the angle of the rebounder to alternate between low, blinding reflex takes and high, swirling aerial catches
🧤 Specialist Wicketkeeping Drills
1. The Fusion Multi-Stump Glove Speed Drill
Purpose:
Develops explosive footwork channels, low takes, and rapid bail-removal speed standing up to the stumps.
Setup:
Plant a set of Fusion Multi-Stump targets securely into the crease deck
The keeper takes up their low, athletic standing-up stance
Method:
A coach stands 10 metres away, executing rapid throwdowns or sidearm feeds targeting just outside the off-stump or spinning down the leg-side line
The keeper must slide their feet across, keep their head perfectly still over the ball, collect the delivery right behind the stumps, and instantly smash the flash-targets to simulate a match-day stumping
2. The Rebounder Deflection & Reflex Drill
Purpose:
Automates blind reflex tracking and hand alignment against unpredictable nicks, deflections, and variations.
Setup:
Position an outdoor rebounder net or Katchet Board directly on the pitch surface 2 metres ahead of the stumps to simulate a batter’s edge or rough footmarks
Method:
The coach feeds balls into the rebounder using a sidearm thrower from the bowler’s end
The keeper stands up to the stumps, stays low, and tracks the ball
As the ball clips the rebounder and alters trajectory wildly, the keeper must react with explosive hand speed, keeping their eyes locked on the ball all the way into the gloves without tensing up
🎯 Armagh CC Live Scenario Training
Enter every session with a specific competitive scenario. Never just field.
🟢 Fielding Scenarios - Inner Ring & Close Cordon
Execute three consecutive clean run outs from the inner ring under match pressure
Catch ten consecutive catches from the rebounder without a drop
Long barrier drill - stop fifteen consecutive hard drives without a misfield
🟡 Fielding Scenarios - Outfield
Retrieve and relay throw accurately to the keeper under pressure — ten consecutive attempts
Hold five consecutive high catches from a sidearm feed at varying heights and angles
Boundary save drill - sprint, slide stop, and return throw into the keeper’s gloves
🔴 Wicketkeeping Scenarios
Complete ten consecutive clean stumpings off spin from the Fusion Multi-Stump drill
Take twenty consecutive deliveries standing back without a fumble or misfield
Leg-side challenge - take ten consecutive deliveries spinning sharply down the leg side without conceding a bye
⭐ Pressure in training creates composure in the match. Make every session count.
⭐ And Remember!
Every fielder drops a catch, misfields, or misses a run out opportunity at some point.
The best fielding sides are not the ones that never make mistakes - they are the ones that back each other, reset fastest, and make their next chance count.
New to our website? Find out how to save us to your home screen for one-tap access.
New to some of the cricket terms above? Visit our Cricket Glossary for clear explanations of every term used across the Academy.

© City Of Armagh Cricket Club | © Armagh Today
Academy Disclaimer and Safety Notice
Important Information – Please Read Carefully:
The training playbooks, guidance, and physical conditioning drills published within the Armagh Cricket Club Digital Academy are provided strictly for educational and informational purposes only. While all technical advice and training methodologies are compiled by qualified club coaches to support safe athletic development, participation in cricket involves inherent physical risks.
Armagh Cricket Club, its coaches, and its volunteers accept no liability for any injury, loss, or damage sustained by individuals practising these drills away from structured, official club-supervised sessions.
Youth Supervision: All junior academy players and minors must have an adult or legal guardian present to supervise physical activities, home drills, and training circuits.
Physical Readiness: Individuals should be in good health and operating within their personal physical limits. If a player experiences pain, acute soreness, fatigue, or discomfort, they must stop the activity immediately and seek professional medical guidance.
By utilising these resources, you acknowledge that you are practising these training methods at your own risk.